
My almost 14-year-old step-son recently asked me if I’d make “one of those circle things I do” for him and his specific request was Yoshi from the Super Mario Nintendo franchise. As this is the first time he has ever asked me to make him something I could hardly say no.
With every project I undertake, whether it’s dressmaking, hand embroidery, knitting or crochet, I like to develop my skills. So I thought I would put to good use the Royal School of Needlwork Stumpwork book I picked up from a charity shop last year for the bargain cost of 50p. Yoshi’s face seemed to lend itself to a raised element, with his giant green nose, so I decided to use a needlelace slip technique to create his face. In stumpwork embroidery, a slip is any separate piece of embroidery worked off the frame and then applied to the main embroidery. There are lots of different ways to make slips, they can be wired; which is great for elements you want to stand out from the fabric such as petals of a flower; can be made from counted canvas, needle painted or plain fabric. I decided to use needlelace, mainly as it is a technique I have not yet tried.

Couching for needlelace slip
The process starts by tracing the shapes you wish to make. I added a couple of milimetres to the edge of the slip as I intended to pad it, meaning it would need to be slightly larger than the original shape. I should point out that I haven’t really used the right embroidery floss for this. Ideally a Perle thread should be used but I only have stranded cotton at the moment so that had to suffice.
Once you have traced the shape the tracing paper is then stitched onto a backing fabric with either a herringbone or running stitch. The tracing paper helps to protect your needle from the backing fabric and creates a barrier between the needlelace and backing fabric. You then couch a thread around the outside of the shape, which is known as the cordonnet. This is the framework for working your needlelace over.

Needlelace slip starting to appear.
The needlelace is created with buttonhole stich, working from left to right, taking the working thread underneath the cordonnet once you get to the end of the row and working the stitches like corded buttonhole stitch, taking your needle under the first loop of the previous row, underneath the cord and over your working thread. I’m not great at tutorial’s so here is a great link to a tutorial for a needlelace heart.
Once I’d created all the shapes I needed, it was time to start assembling the piece. First of all I used some cotton batting to pad the areas of the embroidery I wanted to stand out.

Padding and starting to apply the slips
I then used a single strand of floss in the same colour as the slip to carefully stitch the edges of the slips to the main fabric or each other, where appropriate.

Needlelace slips assembled
Finally I used an attached woven picot, similar to that used for my Wave piece, to create Yoshi’s spikes down his back. His mouth and eyes were finished off with satin stitch.

Yoshi’s finished face
I love the effect this created, I think it gives him so much more character. To make the hoop actually look like a finished piece I created a border of Yoshi eggs and the brick blocks from the classic Mario games.
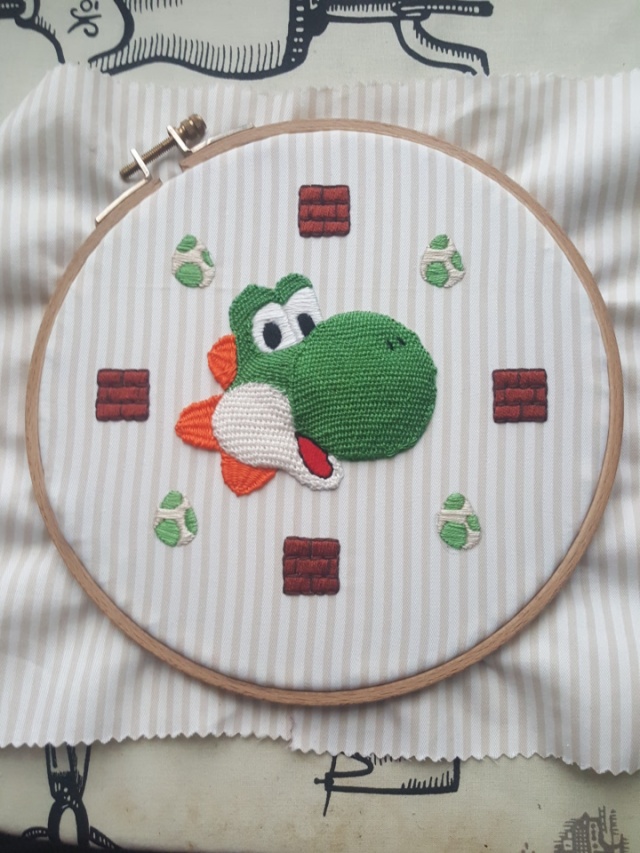
The finished piece
I had great fun making this piece and I was put in the post to my step-son today (he lives about 100 miles away from us now after we moved from Hampshire to Warwickshire in 2015).
I hope you enjoyed me waffling about this piece. If anyone is interested, I have finally decided to open an Etsy shop and have already listed a few items, including my Wave piece.
